Before we start
Some upload tutorials check the files only in JavaScript, and that's the real trap. JavaScript runs on the visitor's machine, so anyone can switch it off, or skip your page entirely and send a request straight to your PHP file. Anything you only checked in the browser goes unchecked, and you can end up with PDFs, spreadsheets or even scripts on your server instead of JPEGs. So in this tutorial the browser code is a convenience for the visitor, and PHP does the real checking.
Everything here is plain JavaScript (fetch() and FormData), PHP's built-in PDO extension and MySQL. No libraries and no build step.
What we're building
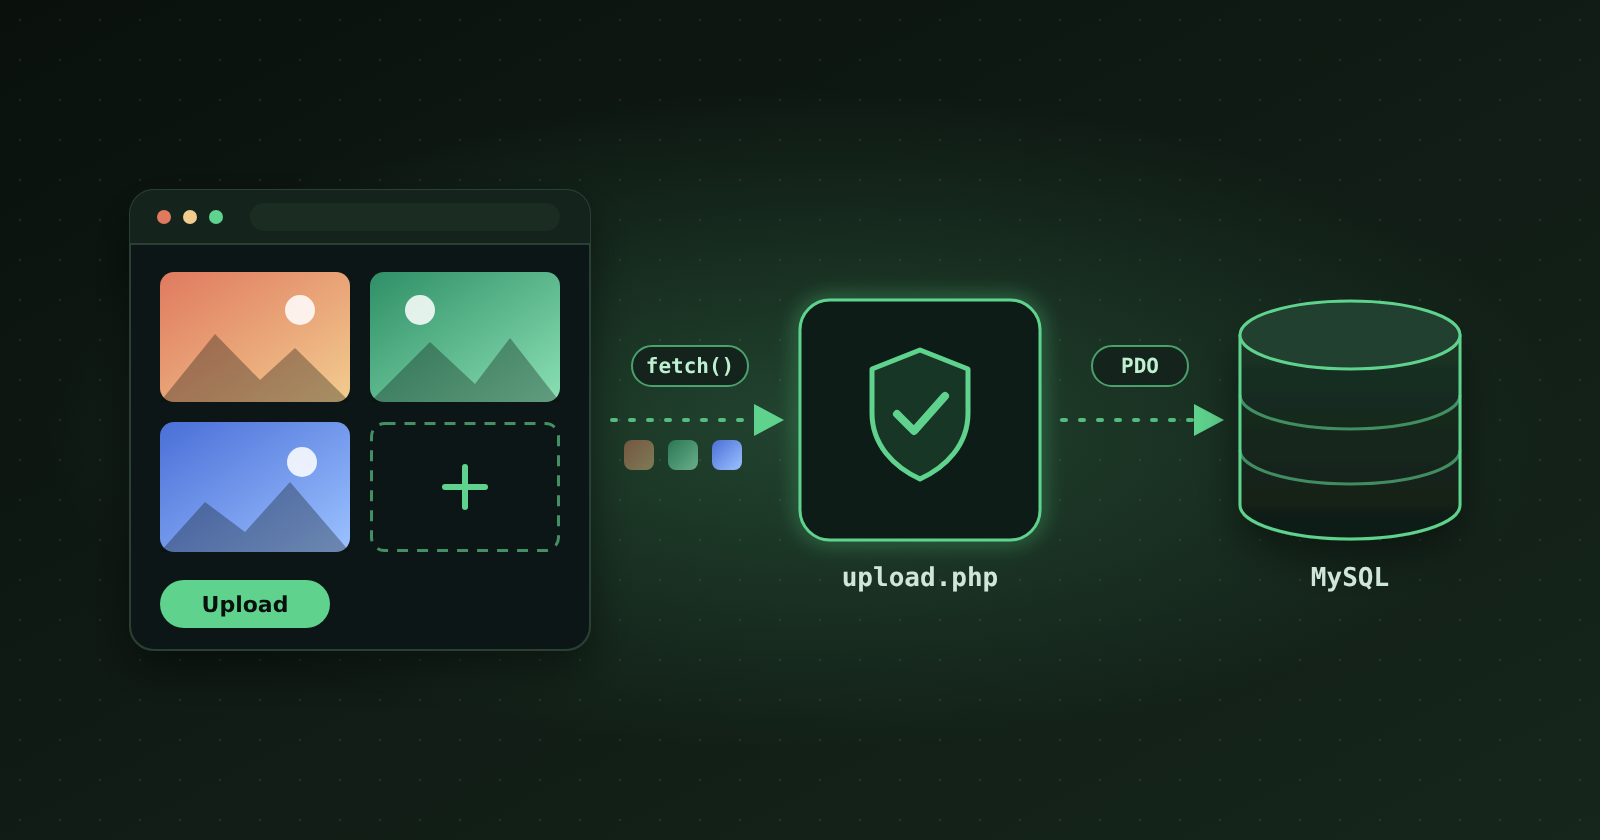
A page where a visitor picks one or more images, clicks Upload, and sees them appear without a page reload. Here is what happens when they click the button:
app.jsstops the normal form submit and sends the files toupload.phpwithfetch().upload.phpchecks every file, saves the good ones intouploads/under a random name, and stores that name in MySQL with PDO.- It answers with JSON: what was saved and what was rejected.
app.jsadds the new images to the page and shows any error messages.
You need PHP 8.1 or newer with the fileinfo and pdo_mysql extensions (both are on in most installs) and a MySQL or MariaDB database. This is the folder layout:
upload-demo/ |-- index.php the form and the gallery|--app.js the JavaScript|--upload.php receives, checks and saves the files|--db.php the PDO connection|--uploads/ where the images end up (must be writable)
Step 1: The database table
I prefer saving only the file name in the database and keeping the image itself in the uploads/ folder. The file name is all I need later to build the <img> tag, and the web server is better at serving files than MySQL is.
CREATE DATABASE IF NOT EXISTS upload_demo
    CHARACTER SET utf8mb4
    COLLATE utf8mb4_unicode_ci;

USE upload_demo;

CREATE TABLE images (
    id          INT UNSIGNED NOT NULL AUTO_INCREMENT,
    file_name   VARCHAR(255) NOT NULL,
    uploaded_at TIMESTAMP    NOT NULL DEFAULT CURRENT_TIMESTAMP,
    PRIMARY KEY (id)
) ENGINE=InnoDB DEFAULT CHARSET=utf8mb4;
uploaded_at fills itself in, so the PHP code never has to touch it.
Next is db.php, the one place that knows how to connect. Every other file just requires it.
<?php
declare(strict_types=1);

$dsn = 'mysql:host=localhost;dbname=upload_demo;charset=utf8mb4';

$pdo = new PDO($dsn, 'your_db_user', 'your_db_password', [
    PDO::ATTR_ERRMODE            => PDO::ERRMODE_EXCEPTION,
    PDO::ATTR_DEFAULT_FETCH_MODE => PDO::FETCH_ASSOC,
    PDO::ATTR_EMULATE_PREPARES   => false,
]);
Three PDO options are doing the work here. ERRMODE_EXCEPTION makes a failed query throw an exception we can catch instead of failing silently. FETCH_ASSOC gives us rows as plain arrays keyed by column name. EMULATE_PREPARES => false makes MySQL prepare statements for real instead of PDO imitating it in PHP.
Swap in your own database user and password. Ideally use a user that can only SELECT and INSERT on this one table.
Step 2: The HTML form
First we start with the HTML form. I like the approach of not using the multiple attribute and giving the visitor several single file inputs instead, all named images[]. That way you or your client can add pictures from different folders, and swap or remove a single one. With multiple you have to select every file at once, which means the same folder, and one wrong click means starting over. You also can't add to a selection, because picking again resets the field.
The [] in the name matters: it tells PHP to collect every input into one array, $_FILES['images']. The accept attribute only filters what the file picker shows. It is a courtesy to the visitor and not a security check, because anyone can override it.
The form tag has enctype="multipart/form-data". A normal form is sent as plain text pairs (key=value), and a file's bytes can't travel that way. Multipart splits the request into one part per field, each with its own headers, so file contents arrive untouched. The MDN docs for the file input cover this in more detail.
One honest footnote: because we'll send the form with fetch() and FormData, the request is multipart whatever the attribute says. I keep it anyway so the form is still a valid upload form on its own.
Save this as index.php. It becomes a real PHP file in Step 5, but for now it is just HTML:
<!doctype html>
<html lang="en">
<head>
    <meta charset="utf-8">
    <meta name="viewport" content="width=device-width, initial-scale=1">
    <title>Image upload</title>
    <style>
        #gallery { display: flex; flex-wrap: wrap; gap: .5rem; }
        #gallery img { width: 200px; height: 200px; object-fit: cover; }
    </style>
</head>
<body>
    <h1>Upload images</h1>

    <form id="upload-form" action="upload.php" method="post" enctype="multipart/form-data">
        <div id="file-inputs">
            <div class="file-row">
                <input type="file" name="images[]" accept="image/jpeg,image/png,image/gif,image/webp">
            </div>
        </div>

        <button type="button" id="add-input">Add another image</button>
        <button type="submit">Upload</button>
    </form>

    <p id="message" role="status"></p>

    <div id="gallery">
        <!-- Step 5 fills this in -->
    </div>

    <script src="app.js"></script>
</body>
</html>
Step 3: The JavaScript
Next we write the frontend functionality. The browser can do all of it natively: FormData wraps up every field in the form, files included, and fetch() sends it to your destination without refreshing the page.
Save this as app.js:
const ACCEPT = 'image/jpeg,image/png,image/gif,image/webp';
const form = document.querySelector('#upload-form');
const fileInputs = document.querySelector('#file-inputs');
const addButton = document.querySelector('#add-input');
const messageBox = document.querySelector('#message');
const gallery = document.querySelector('#gallery');
const submitBtn = form.querySelector('[type="submit"]');
// Add another file input, with a button to remove it again.
addButton.addEventListener('click', () => {
const row = document.createElement('div');
row.className = 'file-row';
const input = document.createElement('input');
input.type = 'file';
input.name = 'images[]';
input.accept = ACCEPT;
const removeButton = document.createElement('button');
removeButton.type = 'button';
removeButton.textContent = 'Remove';
removeButton.addEventListener('click', () => row.remove());
row.append(input, removeButton);
fileInputs.append(row);
});
// Send the form with fetch() instead of letting the browser reload the page.
form.addEventListener('submit', async (event) => {
event.preventDefault();
submitBtn.disabled = true;
messageBox.textContent = 'UploadingÃÂÃÂÃÂÃÂÃÂÃÂÃÂÃÂÃÂÃÂÃÂÃÂÃÂÃÂÃÂÃÂÃÂÃÂÃÂÃÂÃÂÃÂÃÂÃÂÃÂÃÂÃÂÃÂÃÂÃÂÃÂâÃÂÃÂÃÂÃÂÃÂÃÂÃÂÃÂÃÂÃÂÃÂÃÂÃÂÃÂÃÂÃÂÃÂÃÂÃÂÃÂÃÂÃÂÃÂÃÂÃÂÃÂÃÂÃÂÃÂÃÂÃÂÃÂÃÂÃÂÃÂÃÂÃÂÃÂÃÂÃÂÃÂÃÂÃÂÃÂÃÂÃÂÃÂÃÂÃÂÃÂÃÂÃÂÃÂÃÂÃÂÃÂÃÂÃÂÃÂÃÂÃÂÃÂÃÂæ';
try {
const response = await fetch(form.action, {
method: 'POST',
body: new FormData(form),
});
const result = await response.json();
if (!response.ok) {
throw new Error(result.error ?? 'The server rejected the upload.');
}
// Show the new images without reloading the page.
for (const fileName of result.saved) {
const img = document.createElement('img');
img.src = `uploads/${fileName}`;
img.alt = 'Uploaded image';
gallery.prepend(img);
}
const parts = [...result.errors];
if (result.saved.length > 0) {
parts.unshift(`${result.saved.length} image(s) uploaded.`);
}
messageBox.textContent = parts.join(' ') || 'Choose at least one image first.';
form.reset();
} catch (error) {
messageBox.textContent = `Upload failed: ${error.message}`;
} finally {
submitBtn.disabled = false;
}
});Breaking it down:
- Add another image builds a new row with a file input and a Remove button. The input has to be named
images[]too, or PHP won't group it with the others. event.preventDefault()stops the browser's normal form submit, which would reload the page.new FormData(form)collects every field in the form, including each chosen file. Don't set aContent-Typeheader yourself. The browser addsmultipart/form-datatogether with the boundary string, and setting it by hand breaks the request.response.okneeds checking becausefetch()only rejects on network failures. A 400 or 500 from PHP still comes back as a normal response.textContent, notinnerHTML, shows the messages. File names come from the visitor, so never treat them as HTML.disabledandfinallyswitch the Upload button off while the request runs, so a double click can't save every image twice, and always switch it back on afterwards.
Step 4: The PHP
Now that the frontend functionality is complete, we have to write the backend. This is the part that actually protects your server, so none of these checks are optional.
Save this as upload.php:
<?php
declare(strict_types=1);

require __DIR__ . '/db.php';

const UPLOAD_DIR    = __DIR__ . '/uploads/';
const MAX_FILE_SIZE = 5 * 1024 * 1024; // 5 MB per image
const ALLOWED_TYPES = [
    'image/jpeg' => 'jpg',
    'image/png'  => 'png',
    'image/gif'  => 'gif',
    'image/webp' => 'webp',
];

function respond(int $status, array $body): never
{
    http_response_code($status);
    header('Content-Type: application/json');
    echo json_encode($body);
    exit;
}

if ($_SERVER['REQUEST_METHOD'] !== 'POST') {
    respond(405, ['error' => 'Send the images with a POST request.']);
}

// If the whole request is bigger than post_max_size, PHP throws $_FILES away.
if (empty($_FILES['images']) || !is_array($_FILES['images']['error'])) {
    respond(400, ['error' => 'No images were received. They may be too large.']);
}

$finfo  = new finfo(FILEINFO_MIME_TYPE);
$insert = $pdo->prepare('INSERT INTO images (file_name) VALUES (:file_name)');

$saved  = [];
$errors = [];

foreach ($_FILES['images']['error'] as $i => $code) {
    $original = $_FILES['images']['name'][$i];
    $tmpPath  = $_FILES['images']['tmp_name'][$i];
    $size     = $_FILES['images']['size'][$i];

    // 1. An empty file input is fine, skip it.
    if ($code === UPLOAD_ERR_NO_FILE) {
        continue;
    }

    // 2. Did PHP receive the whole file?
    if ($code === UPLOAD_ERR_INI_SIZE || $code === UPLOAD_ERR_FORM_SIZE) {
        $errors[] = "$original is too large.";
        continue;
    }
    if ($code !== UPLOAD_ERR_OK) {
        $errors[] = "$original could not be uploaded (error $code).";
        continue;
    }

    // 3. Our own size limit.
    if ($size > MAX_FILE_SIZE) {
        $errors[] = "$original is larger than 5 MB.";
        continue;
    }

    // 4. What is it really? Look at the bytes, never at the name.
    $mime = $finfo->file($tmpPath);
    if (!isset(ALLOWED_TYPES[$mime]) || getimagesize($tmpPath) === false) {
        $errors[] = "$original is not a JPEG, PNG, GIF or WebP image.";
        continue;
    }

    // 5. Make up our own file name.
    $fileName    = bin2hex(random_bytes(16)) . '.' . ALLOWED_TYPES[$mime];
    $destination = UPLOAD_DIR . $fileName;

    if (!move_uploaded_file($tmpPath, $destination)) {
        $errors[] = "$original could not be saved.";
        continue;
    }

    // 6. Save the file name to the database.
    try {
        $insert->execute([':file_name' => $fileName]);
    } catch (PDOException $e) {
        unlink($destination); // don't leave an orphan file behind
        error_log($e->getMessage());
        $errors[] = "$original could not be saved.";
        continue;
    }

    $saved[] = $fileName;
}

respond(200, ['saved' => $saved, 'errors' => $errors]);
Breaking it down. Because the inputs are named images[], PHP builds $_FILES['images'] as parallel arrays: name, tmp_name, size, error and type. Entry 0 of each belongs to the first file, entry 1 to the second, and so on. That's why the loop walks over error and reads the same $i from the others. The check above the loop covers a request that is bigger than post_max_size: PHP then drops $_FILES completely, and we answer with a readable 400 instead of a blank page.
Inside the loop, every file goes through the same six steps:
- Empty inputs. A file input nobody filled in still arrives, with the error code
UPLOAD_ERR_NO_FILE. We skip it. - Did PHP receive the file? Anything other than
UPLOAD_ERR_OKwent wrong on the way. The common one is a file bigger thanupload_max_filesize, which defaults to only 2 MB, so a phone photo can trip it. More on that in the Locking it down section below. - Our own size limit.
MAX_FILE_SIZEis yours to choose, but it only takes effect if php.ini allows at least that much. - What is it really?
finforeads the first bytes of the file and reports its true type. The type and extension the browser sends are just text the visitor controls, so we never use them.getimagesize()is a second opinion: it fails on anything that isn't a readable image. - Our own file name.
bin2hex(random_bytes(16))gives 32 random characters, and the extension comes from our lookup table based on the detected type. Never reuse the visitor's file name: it can overwrite another upload, contain path tricks, or end in.php.move_uploaded_file()also confirms the file really arrived as an upload. - Save the name with PDO. The statement is prepared once before the loop and executed for each file. The
:file_nameplaceholder means the value is never glued into the SQL string. If the insert fails we delete the file again, so nothing is left on disk without a row.
At the end respond() sends everything back as JSON. The file names in the error messages come from the visitor, which is why Step 3 shows them with textContent.
Step 5: Displaying the images
Showing the images is the easy part, because the database only holds file names. It takes two edits to index.php. First, add this at the very top, above <!doctype html>:
<?php
declare(strict_types=1);

require __DIR__ . '/db.php';

$images = $pdo->query('SELECT file_name FROM images ORDER BY id DESC')->fetchAll();
?>
Then replace the <!-- Step 5 fills this in --> comment inside the gallery div with a loop:
<div id="gallery">
    <?php foreach ($images as $image): ?>
        <img src="uploads/<?= htmlspecialchars($image['file_name']) ?>" alt="Uploaded image">
    <?php endforeach; ?>
</div>
Two small things here. query() is fine because no visitor input is part of the SQL. The moment a variable goes into a query, switch to prepare() and placeholders like we did in upload.php. And htmlspecialchars() escapes the value on its way out. The names are random today, but it is a good habit to escape whatever comes out of the database.
The newest images come first thanks to ORDER BY id DESC, and app.js uses gallery.prepend(), so an image you just uploaded lands in the same spot it will have after a reload. Once you have hundreds of images, add a LIMIT and some pagination.
Now open index.php in your browser, pick a couple of images and click Upload.
Locking it down
The code above is a solid base. Before it goes on a real server, go through these:
- Don't let the uploads folder run code. The checks in Step 4 show that a file looks like an image, not that it is harmless. A 34-byte file that starts with
GIF89aand continues with one line of PHP passes bothfinfoandgetimagesize(), because both mostly read the header. Such a file does no damage as long as your server never runs anything inuploads/as PHP. On Apache, put this.htaccessfile insideuploads/:<FilesMatch "\.(php|phtml|phar)$"> Require all denied </FilesMatch>
On Nginx, make sure nolocationblock handsuploads/to PHP-FPM. To go further, re-encode every image with GD (decode it, save it again) so only pixels survive, or keep the files outside the web root and serve them through a PHP script. - Raise PHP's upload limits. The defaults are 2 MB per file (
upload_max_filesize), 8 MB per request (post_max_size) and 20 files per request (max_file_uploads). A phone photo is often bigger than 2 MB, and it gets rejected as too large. Set limits that matchMAX_FILE_SIZEin php.ini, then restart PHP:upload_max_filesize = 5M post_max_size = 40M max_file_uploads = 8post_max_sizecovers all files of one request together, so 40M leaves room for eight full-size 5 MB images. - Keep the folder permissions tight. Only the web server's user needs to write to
uploads/. Give that user ownership of the folder instead of reaching forchmod 777. - Decide who may upload. As written, anyone who finds the page can upload. Put a login in front of it, and add a CSRF token to the form before this goes anywhere important.
Wrapping up
That's the whole thing: a form with as many file inputs as you need, one fetch() call, and a PHP script that checks every file before it touches your disk or your database. If a visitor switches JavaScript off, or skips your page and posts straight to upload.php, the server still does the checking.
Some ideas for taking it further:
- Delete button. A second endpoint that looks up the row, removes the file with
unlink(), then deletes the row. - Thumbnails. Resize with GD while saving, so the gallery doesn't load full-size photos.
- Drag and drop. The
dropevent hands you the sameFileobjects, and you can append them to aFormDatayourself. - Progress bar.
fetch()doesn't report upload progress, whileXMLHttpRequestdoes throughupload.onprogress.